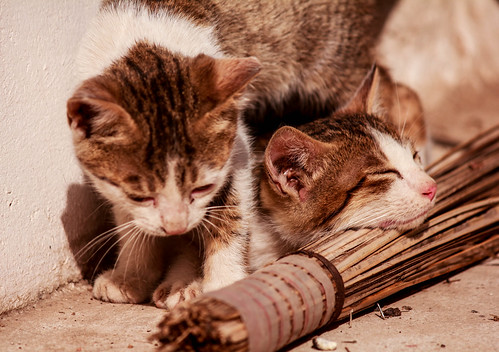
For more kitty pics click here
Friday 28 December 2012
Friday 14 December 2012

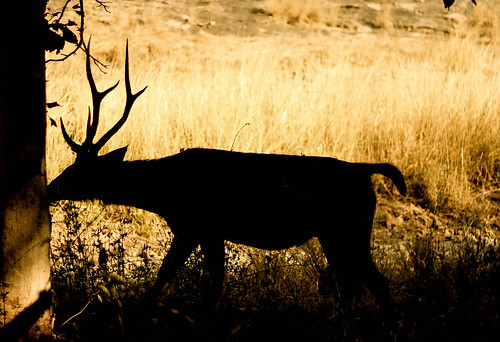
Spotted my prey !
As the year draws to end , I go through all my pictures of various places which are doomed to reside in my hard disk for ever and ever,never to see the light of any upload anywhere.I give them ...and myself ..another chance..to visualise them into something thats is more pleasing to the eye than I originally believed.
This is a picture of an aging lion,clicked in the wild of Bannerghata National Park near Bangalore.Despite his age (yes I dont refer to animals as 'it' ) , his predatory instincts were as sharp as a tack as observed his prey and waited for the kill

This is a picture of an aging lion,clicked in the wild of Bannerghata National Park near Bangalore.Despite his age (yes I dont refer to animals as 'it' ) , his predatory instincts were as sharp as a tack as observed his prey and waited for the kill
Wednesday 10 October 2012

Tuesday 25 September 2012
ColdFusion IceBreaker #7 : Unprotect your protected PDF through CF
Protecting your PDF with a password is a common everyday use case .
Using ColdFusion this can be done in a single easy step.
But sometimes we need to programmatically de-crypt/un-protect the same PDF.
There can be various ways of accomplishing this feat,but again ColdFusion makes it easy and a single step process
The trick to get to the treat ( the un-protected pdf , in this case ) is to use cfpdf tag and set your encyption to none using the "encrypt" attribute. You can do so only if you have the owner password , as technically only the document owner should have the permissions to change the security settings of a document
So assuming your PDF is called MyPdf.pdf with a owner password of "changesettings",use the below mentioned code to remove password protection from your PDF
Open MyUnsafePdf.pdf and you have your pdf without password protection
Using ColdFusion this can be done in a single easy step.
But sometimes we need to programmatically de-crypt/un-protect the same PDF.
There can be various ways of accomplishing this feat,but again ColdFusion makes it easy and a single step process
The trick to get to the treat ( the un-protected pdf , in this case ) is to use cfpdf tag and set your encyption to none using the "encrypt" attribute. You can do so only if you have the owner password , as technically only the document owner should have the permissions to change the security settings of a document
So assuming your PDF is called MyPdf.pdf with a owner password of "changesettings",use the below mentioned code to remove password protection from your PDF
<cfpdf action="protect" source="MyPdf.pdf" destination="MyUnsafePdf.pdf"
 password="changesettings" encrypt="none" />
Open MyUnsafePdf.pdf and you have your pdf without password protection
Wednesday 19 September 2012
Convert your pfx keystore to jks keystore
Many times we need to convert our PKCS12 keystore/digital signature/digital id file to JKS files.
There are various many ways of doing it . Most blogs talk about how OpenSSL would help you do it and other go on about new tools.But its all within java keytool's capabilities.
Its actually as simple as what I quote below.
Goto your <JAVA_HOME>/jre/bin
This process will create a new jks file and call it exportfrompfx.jks
All the certificates with their aliases will be exported from MyPfx.pfx to exportfrompfx.jks
Use the following command then to verify your new keystore:
To selectively add each certificate use its alias.
Get the alias using the above mentioned list command
Use keytool to import that alias into your JKS keystore
There are various many ways of doing it . Most blogs talk about how OpenSSL would help you do it and other go on about new tools.But its all within java keytool's capabilities.
Its actually as simple as what I quote below.
Goto your <JAVA_HOME>/jre/bin
keytool -importkeystore -srckeystore MyPfx.pfx -srcstoretype pkcs12 -srcstorepass mysrcpassword -destkeystore exportfrompfx.jks -deststoretype jks -deststorepass mydestpassword
This process will create a new jks file and call it exportfrompfx.jks
All the certificates with their aliases will be exported from MyPfx.pfx to exportfrompfx.jks
Use the following command then to verify your new keystore:
keytool -list -storetype jks -keystore exportfrompfx.jks -v
To selectively add each certificate use its alias.
Get the alias using the above mentioned list command
keytool -list -storetype jks -keystore exportfrompfx.jks -v
Use keytool to import that alias into your JKS keystore
keytool -importkeystore -srckeystore MyPfx.pfx -srcstoretype pkcs12 -srcstorepass mysrcpassword -srcalias alias -destkeystore exportfrompfx.jks -deststoretype jks -deststorepass mydestpassword -destalias destalias
Thursday 13 September 2012
Burst of Colour


Burst of Colour, a set on Flickr.
Clicked at the annual flower show held every August in Bangalore, these flowers bring to life the delight experienced by the 1.2 lakh people who visited this flower show every day.You can also buy various varieties of plants.
Wednesday 12 September 2012
Monsooned

A pool full of lotus leaves gets monsooned in wayanad..water..both above and below the leaves..looking absolutely lovely
Thursday 16 August 2012
ColdFusion IceBreaker #6: JBOSS 7.1 and OpenOffice on Mac OSX for ColdFusion cfdocument
In continuation of ColdFusion IceBreaker #5: JBOSS 7.1 and OpenOffice for ColdFusion cfdocument,
this post lists the detailed steps to follow for running OpenOffice code on JBOSS 7.1 on MAC OSX.
1)Install OpenOffice and add the installation path in the ColdFusion Admin
2)Edit the module.xml located in <JBOSS_HOME>/modules/sun/jdk/main and put the following entry there:
<path name="com/sun/star/lib/loader"/>
3)Copy oosdk folder from <jboss-deployment-dir>/cfusion.ear/cfusion.war/WEB-INF/cfusion/lib/ to /System/Library/Java/JavaVirtualMachines/1.6.0.jdk/Contents/Home/lib/ext. Though this is not recommended by MAC its the quickest way to ensure that the code runs well :P.
4)Edit standalone.conf located in <JBOSS_HOME>/bin
5)To JAVA_OPTS add the following entry:
-Djava.ext.dirs=<jboss-deployment-dir>/cfusion.ear/cfusion.war/WEB-INF/cfusion/lib/oosdk/:<java-home>/lib/ext/
Here we use /System/Library/Java/JavaVirtualMachines/1.6.0.jdk/Contents/Home/lib/ext if our JAVA HOME is default instead of <java-home>/lib/ext/
6)Restart jboss and you're all set
OpenOffice+OSX Error: "The application...restore windows.." in OSX 10.7
While running OpenOffice on Mac OSX 10.7.1 ,sometimes we repeatedly get an error "The application 'OpenOffice.org' was forced to quit while trying to restore its windows.Do you want to restore its windows again"
This is a persistant popup which might lead you into thinking that something is catastrophically wrong with your OpenOffice installation.
There are several solutions on the web but the only way that worked for me is as follows:
1) Kill all instances of soffice/OpenOffice.org
2) Goto /Users/<you>/Library/Saved Application State
Library is a hidden folder ,so use Go->Go to folder from the Finder Menu
3)Look for the folder org.openoffice.script.savedState
4)Delete this folder!!!
5)Now try to use Openoffice again.
You can observe that the popup disappears.
Alternatives (in case the previous method did not help)
1) Kill all instances of soffice/OpenOffice.org
2) Goto /Users/<you>/Library/Application Support/OpenOffice.org/3
Library is a hidden folder ,so use Go->Go to folder from the Finder Menu
3)Look for a folder named user
4)Rename user folder to user.old (just so that you have backup)
5) Now try to use Openoffice again.
(If that still doesn't fix your problem , delete the new user folder and restore user.old to user and try again)
Thursday 9 August 2012
That light through the window...
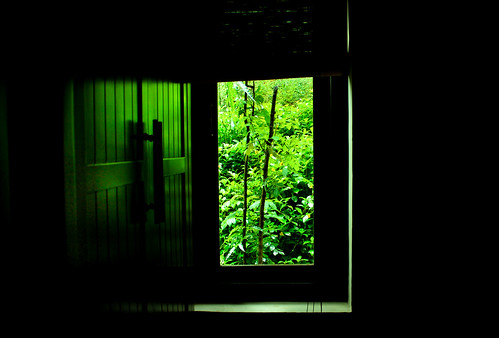
Wayanad as seen from the window of my room .The day was defined by alternating showers of rain and wet sunlight.Perfect for putting up your feet and huddling in with a good book.I sacrificed those other worldly pleasures for this pic ;).
Location: Wayanad,Kerela .
Wednesday 8 August 2012
A bit of sunshine amidst the grey..
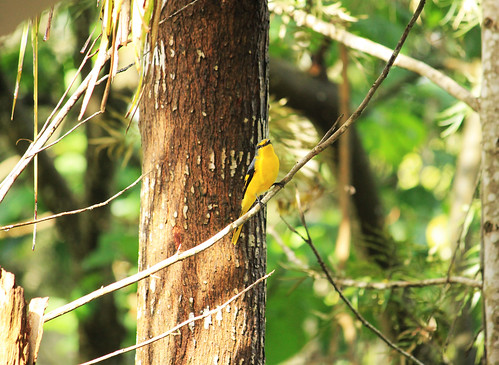
A sunny bird enjoying her time in the scanty sunlight in Wayanad,Kerela
Thursday 26 July 2012

Wednesday 25 July 2012

Wednesday 13 June 2012
Simple plugins with PhoneGap1.7 Android
Recently I had a major run in with PhoneGap 1.7 and since I had a lot of java just begging to be called I ended up using plugins in PhoneGap.
Though there is a decent example on the PhoneGap website , I found it a little off base for a first plugin example , to explain just the basic functioning of plugins.The example I post here is a beginner level example which will help you understand the basic mechanism of plugins without any fancy stuff.
Steps :
1)Create an PhoneGap powered Android Project using phonegap docs
2)This is where we write our business logic . Create a java file MyPluginClass . This class will return some standard string to a html. You need to override the execute method of Plugin class and send back your result in a PluginResult object
successCallback : This method will be called after the plugin gets executed
failureCallback : This method will be called in case of error
We can also pass arguments to the Java class through the array
4)Register the plugin in plugins.xml with :
Though there is a decent example on the PhoneGap website , I found it a little off base for a first plugin example , to explain just the basic functioning of plugins.The example I post here is a beginner level example which will help you understand the basic mechanism of plugins without any fancy stuff.
Steps :
1)Create an PhoneGap powered Android Project using phonegap docs
2)This is where we write our business logic . Create a java file MyPluginClass . This class will return some standard string to a html. You need to override the execute method of Plugin class and send back your result in a PluginResult object
package org.firstplugin;


public class
MyPluginClass extends Plugin{


@Override

public PluginResult execute(String action, JSONArray data, String callbackID) {

       try{

       PluginResult rs=null;

      /* Create the JSONObject which will be sent in PluginResult */

      JSONObject jsonobj=new JSONObject();

    /* Add whatever you want to send back to PhoneGap in the JSONObject */

       jsonobj.put("myname","whats in a name");

   /*  Put your JSONObject in a PluginResult object */

       rs=new PluginResult(Status.OK,jsonobj);

}
catch(JSONException e){ LOG.d("DEBUG",e.getmessage())}

/* Send your PluginResult object back to PhoneGap */

return rs;
}

}
3)Now we shall write the plugin javascript which will call MyPluginClass.This "myplugin.js" JS file will call PhoneGap.exec which in turn will call the execute method of MyPluginClass.var CallPlugin=function(){};
CallPlugin.prototype.get=function(successCallback,failureCallback){
return PhoneGap.exec(successCallback,failureCallback,' MyPluginClass ','show',[ ]);
};
PhoneGap.addConstructor(function() {
//Register the javascript plugin with PhoneGap
PhoneGap.addPlugin('callplugin', new CallPlugin());
});
In detail :successCallback : This method will be called after the plugin gets executed
failureCallback : This method will be called in case of error
We can also pass arguments to the Java class through the array
4)Register the plugin in plugins.xml with :
<plugin name="
MyPluginClass" value="
org.firstplugin.MyPluginClass"></plugin>
5)Now write the html which will execute this plugin.Click the button " Click Me To Return Name" to run the plugin
<!DOCTYPE html>

<html>

    <head>

        <meta charset="utf-8" />

        <meta name="viewport" content="width=device-width, initial-scale=1" />

        <title>

        </title>

        <link rel="stylesheet" href="http://code.jquery.com/mobile/1.1.0/jquery.mobile-1.1.0.min.css" />

        <link rel="stylesheet" href="my.css" />

        <link rel="stylesheet" href="photoswipe.css" type="text/css"/>

        <style>

           /* App custom styles */

        </style>

        <script type="text/javascript" src="klass.min.js"></script>

        <script src="http://ajax.googleapis.com/ajax/libs/jquery/1.7.1/jquery.min.js">

        </script>

        <script src="http://code.jquery.com/mobile/1.1.0/jquery.mobile-1.1.0.min.js">

        </script>

        <script src="cordova-1.7.0.js">

        </script>

        <script src="
myplugin.js">

        </script>

      </head>

    <body>


         <div data-role="page" id="home">

              <div data-theme="a" data-role="header">

                <h3>

                    Plugin Example

                </h3>

               </div>

               <div data-role="content">

                <div>

                        <a data-role="button" data-transition="fade"  id="runplugin">

                            Click Me To Return Name

                        </a>

                        </div>

                </div>

               <div data-role="footer"></div>

         </div>

<script type="text/javascript">


$("#
runplugin").click(function(e){

     window.plugins.callcamplugin.get(

function(r){alert(JSON.stringify(r);},

function(e){console.log(e)}

);

});


</script>

   </body>

</html>
Using this code you will be able to run a simple plugin using PhoneGapFriday 27 April 2012
The Underrated Source of Everything!
"Too often we are so preoccupied with the destination,we forget the journey"
Is it just as forgotten as it is in the old saying..that no one really wonders about how it all began,what led to its inception..somehow it is all about the journey or the destination..the traveller with his tales..did he ever say what made him start.. and led to his travels..and I dont mean the thought process or how it struck him..just the trigger that made him get up and get out..that moment suspended in time when you made a path setting decision..and then promptly forgot what made you do it...nope not the thoughts,rather the act,thats what you let go of!
This seemingly uncaring way of being is a waste of some really special information,that elusive "something" which made u act! So you were thinking about something..maybe as inconsequential as asking someone out!..and then that "something" happened and you actually did it..u had your beautiful journey ,took it as it came..and then it changed..did you look back on your "something" and re-live your journey from there on,only to realise how you got to your present? Maybe it could have set the process to improve the present situation,if not then maybe suggest a new thought process,the beginning of yet another journey maybe?
So why not build a new strategy,whenever you are stuck in a muddle and you don't know how to get out of it,look back to what got you there.Remember the trigger and then relive it..and let it set the trend for some new inspiration!
Wednesday 18 April 2012

ColdFusion IceBreaker #5: JBOSS 7.1 and OpenOffice for ColdFusion cfdocument
In JBOSS7.1 , there have been major changes in the class loading behaviour of applications .Due to this we need to make a few changes to use ColdFusion's cfdocument and other OpenOffice features.Class loading is based on modules,with each module having its module.xml in which one can specify dependencies on the other modules using the <dependencies> element.
To support OpenOffice with JBOSS7.1 for cfdocument, you need to:
1)Install OpenOffice and add the installation path in the ColdFusion Admin
2)Edit the module.xml located in <JBOSS_HOME>/modules/sun/jdk/main and put the following entry there:
<path name="com/sun/star/lib/loader"/>
3)Start JBOSS with the following flag in the standalone.bat/standalone.sh.
-Djava.ext.dirs=<jboss-deployment-dir>/cfusion.ear/cfusion.war/WEB-INF/cfusion/lib/oosdk/:<java-home>/lib/ext/
(':' for unix based machines and ';' in windows)
The <dependecies> element can be used to specify dependencies on the paths and packages from the class loader which loaded JBoss Modules.These can in turn be specified for re-exported if specified using the <export> element.The <path> element is used here to list the paths.
Adding the oosdk package to the java.ext.dir ensures that the classes of that package can be found and loaded without them being on the actual class path.
One need not add the individual jars to the JBOSS classpath or the java classpath
Click here for MAC OSX specific instructions. These just make life easier :D.
Monday 2 April 2012

Thursday 1 March 2012
ColdFusion IceBreaker #4 : The "CF10-HTML5 Video" story begins !
With Coldfusion 10, we deep dive into the world of HTML5 video support through the CFMEDIAPLAYER tag.
Then(CF 9) : The cfmediaplayer tag could only support Flash videos,the likes of flv,f4v.
Now (CF 10): The cfmediaplayer can now support HTML 5 videos , the likes of mp4,ogv,webm ; formats conditioned for video playback over the internet.These require no additional plugins. You can skin/style the player,use Javascript functions ,set event handlers and even set a customised title !
More on all that later!!
Snippet #1: Just specify your HTML5 video in the source attribute of the cfmediaplayer tag
<cfmediaplayer name="player1" source="sample_webm.webm" />Play the snippet in Firefox or Chrome to view the webm video
Alternately , you can use ColdFusion.MediaPlayer.setSource() method and add to your existing code.
Snippet #2 : Use the all new "type" attribute to tell your browser whether to play the same video as flash or HTML. This is pretty useful when you want to enforce a particular type of content to be sent to the client.
MP4 videos can play as flash and HTML videos. This essentially means that if you try to play an MP4 video with flash enabled,you see a flash player loaded (right click on the player and observe the "About Flash Player" info ) and when flash is disabled the HTML% player is loaded
Try this in Chrome to see the difference:
<cfmediaplayer name="player2" source="sample_mp4.mp4" type="html" /><br>
<cfmediaplayer name="player3" source="sample_mp4.mp4" type="flash" />
The Flash and HTML5 players have been designed to look as identical as possible so as to support seamless fallback.
Snippet #3: Use the HTML source tag to set multiple videos as sources to the cfmediaplayer tag and let ColdFusion handle the video playback depending on video support by the browser
<cfmediaplayer name="player4" source="sample_webm.webm" type="html">
<source src="sample_mp4.mp4" type="video/mp4" />
</cfmediaplayer>
Now play the snippet in IE9,Firefox,Chrome and Safari .
You will see :
IE9 and Safari5 : playing sample_mp4.mp4 in HTML because it currently doesnt support WEBM
Firefox and Chrome : playing sample_webm.webm
A few things to consider :
1)Use the <!DOCTYPE html > and the <head/> <body> tags to write your cfm page for best results. A few browsers will not render the player properly otherwise!
2)Can't play your video ? Are you using a web server ? Then make sure the right mime-types are added so that content can be served to the client.
3)Video playback is subject to browser support for formats,codecs and rendering.
More on Flash-HTML fallback in the next post!
Downloads :
Right Click and save as to download sample_mp4.mp4
Right Click and save as to download sample_webm.webm
Monday 27 February 2012

Monday 13 February 2012
Enable debugging in Websphere Application Server 7.0 ND
Generally ,debugging is one of the most handy things to have in a Application Server and as such easy to enable.
I had a pretty tough time for WAS 7.0 when I went through the conventional way of adding debug properties to the Java args. The server literally gave up and refused to start.
After a bit of googling and reading the detailed WAS documentation,I realised it was simpler to do so in Websphere than in many of the other simpler application servers
Here are the steps :
1)Log on to the IBM Websphere Administrative console.This typically runs on the ports 9060(unsecure) and 9443(secure)
2)Navigate to Servers->Server Types->WebSphere application Servers-><application server>
3)Click the WAS instance on which you want to enable debugging.

4)In the configuration tab,scroll down to the Additional Properties
5)Click on "Debugging Service"

6)Check the "Enable service at server startup" checkbox.
7)Click on Apply and click Review to review your changes
8)Check the "Synchronize changes with Nodes" checkbox (unless Automatic synchronization is enabled)
9)Click the Save button
10)Once the Synchromization is complete (This might take a few seconds) ,click OK and then restart the WAS instance .
11)Now you are all set to fire debug requests on the JVM debug port (as specified in the Debugging service page.Default is 7777)
Sunday 22 January 2012
ColdFusion IceBreaker #3: Configuring Websphere Application Server (WAS) with OpenOffice to support ColdFusion (CF) tagcfdocument
Configuring Websphere Application Server (WAS) with OpenOffice to support ColdFusion (CF) tag cfdocument.
Websphere Application Server (WAS) is considered a fairly typical application sever considering its complex topology and various flavours.
This post is in continuation to the previous one which spoke of OpenOffice Configuration on JBOSS on Lion
Here I shall detail how to configure the same in Websphere Application Server 7.0 ND (WAS) using IBM HTTP Server as the web sever.
The process is rather simple if you consider the amount of time and effort taken on other servers
1)Goto WAS Integrated Console
2)Goto Servers->Websphere Application Servers->server1
server1 is the default websphere application server created for a profile.Please use the the server on which you have deployed your ColdFusion Zeus application.For my purpose,I have used server1 and have deployed my ColdFusion ear on this server.
3)Click server1
4)On the Configuration tab of server1 , look for Java and Process Management.This can be found under Server Infrastructre section.Click "Java and Process Management"
5)Click "Process definition " from the Java and Process Management sub section
6)On the Configuration tab , look for Additional Properties.Under Additional Properties , you will find a Java Virtual Machine link.Click it.
7)Place your links in Classpath text box using semi colon as the delimiter.For Example :
C:\<was -deployement-directory>\AppServer\profiles\<profile-name>\installedApps\<cell-name>\Adobe_ColdFusion_Zeus.ear\cfusion.war\WEB-INF\cfusion\lib\oosdk\lib\juh.jar; C:\<was -deployement-directory>\AppServer\profiles\<profile-name>\installedApps\<cell-name> \Adobe_ColdFusion_Zeus.ear\cfusion.war\WEB-INF\cfusion\lib\oosdk\lib\jurt.jar C:\<was -deployement-directory>\AppServer\profiles\<profile-name>\installedApps\<cell-name> \Adobe_ColdFusion_Zeus.ear\cfusion.war\WEB-INF\cfusion\lib\oosdk\lib\ridl.jar; C:\<was -deployement-directory>\AppServer\profiles\<profile-name>\installedApps\<cell-name> \Adobe_ColdFusion_Zeus.ear\cfusion.war\WEB-INF\cfusion\lib\oosdk\lib\unoil.jar; C:\<was -deployement-directory>\AppServer\profiles\<profile-name>\installedApps\<cell-name> \Adobe_ColdFusion_Zeus.ear\cfusion.war\WEB-INF\cfusion\lib\oosdk\classes
8)Restart your WAS server and you are good to go
Subscribe to:
Posts (Atom)